Knowledge Base Themes
All Administrators and Super Administrators have full access to the code. To learn more about user roles, please refer to this article.
Your themes can be found in Customize > Themes. There are 12 options available and you can customize all of them!
Examples
You can find some of the best knowledge base examples at https://helpjuice.com/knowledge-base-examples!
Article Editor
Callout Blocks
When you're creating content for your Knowledge Base, it's important to ensure that crucial information stands out. That’s where callout blocks come in. Callouts are designed to highlight key messages or sections of your article, making it easy for readers to notice important details. Here's everything you need to know about using callout blocks effectively.
What Are Callout Blocks?
Callout blocks are specialized text boxes that you can add to your articles to draw attention to specific information. They help break up the text and emphasize key points, making your content more engaging and easier to read. Whether you're sharing important instructions or cautioning readers about potential issues, callouts ensure those details won't be overlooked.
Types of Callout Blocks
There are four types of callout blocks available, each serving a different purpose:
Info Callout
Use this to highlight general information that might be useful to readers. It’s a great way to call attention to tips, advice, or helpful reminders.

Warning Callout
If there’s something readers should be cautious about, the warning callout is the right choice. It’s perfect for alerting users to potential issues or things they should avoid while following instructions.

Success Callout
Celebrate milestones, achievements, or completed tasks with the success callout. This block is ideal for emphasizing positive outcomes or confirming that something has been successfully accomplished.

Danger Callout
For more serious alerts or critical information that readers must not ignore, the danger callout is your go-to. This type of callout is often used to warn of risks or severe consequences.

Why You Should Use Callouts
- Highlight Key Information: Callouts make important details stand out, ensuring readers don’t miss critical points within your article.
- Improve Readability: By breaking up dense text, callouts allow for smoother navigation and a more enjoyable reading experience, especially for users skimming for essential information.
- Focus Attention: With their distinct appearance, callouts naturally draw the reader’s eye to the most relevant parts of your content, enhancing overall engagement.
- Clarify Critical Points: Callouts help separate routine information from vital warnings or tips, ensuring users understand the significance of certain sections quickly and clearly.
By incorporating callouts into your Knowledge Base articles, you can ensure that your readers find and understand the most important information quickly and effectively.
Tabs in the Editor
What are Tabs?
Tabs offer a seamless way to organize and navigate between multiple documents or views—all within a single window. Tabs make it easy to work on different content at the same time, keeping your workspace tidy and efficient.
Tab A
Content A
Tab B
Content B
Tab C
Content C
Insert a Tab
- Click on the Insert Tab button to begin inserting tabs.
- Add your title in the Tab Title field and your content in the Tab Body field.

Insert Multiple Tabs
If you need to insert multiple tabs, you just need to click on the Insert Tab to add as many tabs as you need, once for each tab.

FYI The tabs will be displayed next to each other by default in the frontend, however in the Article Editor they will be one below the other.
Files Manager
What is the Files Manager?
The Files Manager in Helpjuice is a centralized hub where you can upload, store, and manage all the files you need for your knowledge base articles. Whether it's images, videos, documents, or other file types, the Files Manager ensures that your files are easily accessible and always available for integration into your articles. It eliminates the risk of broken links and missing files caused by external storage platforms.
Why Use the Files Manager?
Using Helpjuice’s Files Manager offers several key advantages:
- Guaranteed Availability: Any file uploaded to the Files Manager is securely stored within Helpjuice. This means that files inserted into articles from the Files Manager will always be available, as long as they are not deleted from your account. Files from external platforms, such as cloud storage services, risk becoming unavailable if they are deleted or moved. By storing your files directly in Helpjuice, you avoid broken file links, ensuring a seamless experience for your readers.
- Wide File Format Support: The Files Manager supports a variety of file types, including images (e.g., PNG, JPG), videos (webm, ogg, mp4), documents (PDFs, Word, CSV, Excel), and even SVGs. This flexibility ensures you can upload all your content without worrying about format compatibility.
- No Storage Limits: There’s no limit on the amount of storage you can use in the Files Manager, so you can upload as many files as necessary without worrying about running out of space.
How to Use the Files Manager
You can upload files to the Files Manager through two main methods:
Uploading from the Article Editor
- While creating or editing an article, click the Files Manager icon in the editor toolbar.
- Click Upload File to add a new file.
- You can then either:
- Click “Click here to upload” to select a file from your computer,
- Drag and drop a file directly into the window, or
- Upload from a URL if your file is hosted online.
The uploaded file will be available for immediate insertion into your article, ensuring a smooth integration process.
Uploading Directly from the Files Manager Section
- Navigate to the Files Manager from the main Helpjuice interface.
- Click Upload File and follow the same steps outlined above (select from your computer, drag and drop, or upload via URL).

Organizing and Managing Files
The Files Manager comes with several built-in features to help you stay organized and ensure easy file retrieval:
Folder Structure
You can create folders to categorize and organize your files logically. This helps you quickly locate the files you need, especially if you manage a large number of them.

Files Section
The Files Manager automatically categorizes your files into sections like:
- Recent Files: Displays files that you’ve recently uploaded or interacted with.
- Images: Dedicated to all image files.
- Videos: Stores video files.
- Documents: Houses PDFs, Word documents, spreadsheets, and more.
- Recently Deleted: Files deleted from the Files Manager will appear here for 30 days before being permanently removed.

File Details Columns
In the Files Manager, each file is listed with the following information:
- File Name: The name of the uploaded file.
- File Size: The size of the file.
- Type: The format of the file (e.g., image, document, video).
- Date: The date the file was uploaded.
- Modified: How long ago the file was last modified, which may occur when the file is replaced or moved within the Files Manager.
- Used In: Displays the published articles where this file has been used.
- Last Modifier: The user who last made changes to the file.

How do I Find a File?
The search bar at the top of the Files Manager allows you to quickly find files by name or keywords. This is especially useful when managing a large repository of files, allowing you to filter through results and locate the exact file you need in seconds.

Downloading Files from the Files Manager
To download any file from the Files Manager to your local computer:
- Click on the file you wish to download.
- Select the Download option.

The file will then be saved to your computer for offline use.
Article Decision Trees
What are Decision Trees?
Decision trees are a simple way for you to present different answers, based on a series of answers to questions. Some people refer to it as 'troubleshooting'.
How do Decision Trees work?
With Decision trees, you are able to ask a series of linked questions, in order to present different responses based on the answers to those questions!
Decision Trees Example
Below is an example of a decision tree. It took us 60 seconds to make it using the Helpjuice Decision Trees editor.
This will determine if you should use decision trees.
Do you need to present different answers to the same question?
How do I create a Decision Tree?
It's super simple:
1. Go onto your Helpjuice Article that you want to create a decision tree.
2. Click on the decision tree icon 
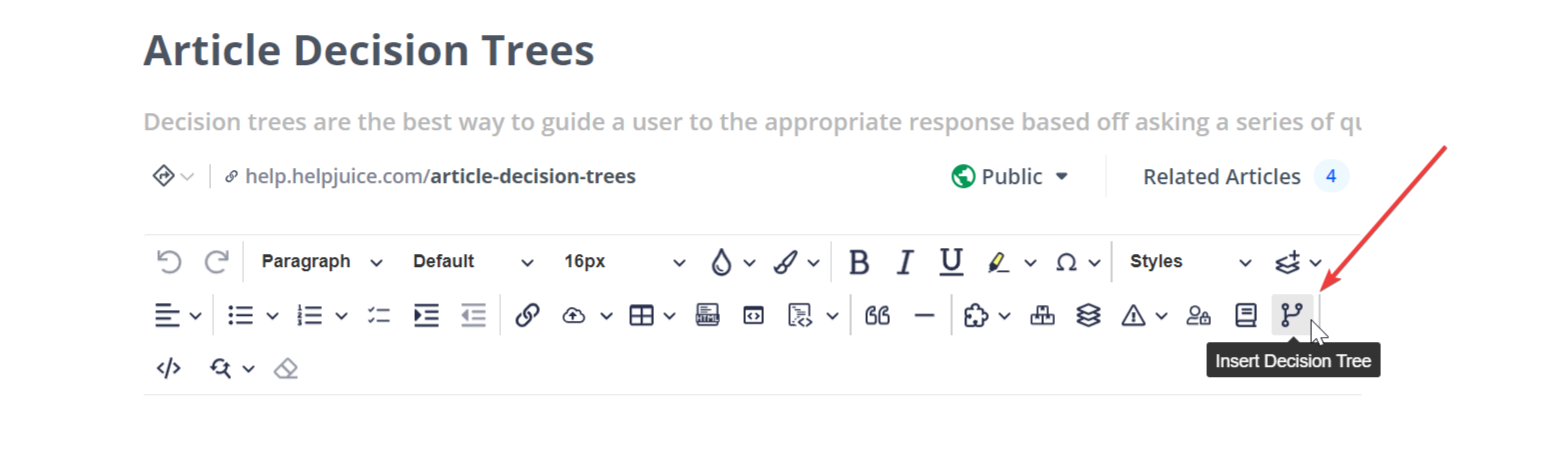
3. You'll now see a decision tree, with your first question, and sample buttons/response prefilled. You can add as many buttons as you'd like, and clicking on one button will allow you to add children's questions/buttons to it.
You can also add images and videos to the questions and responses!
4. Once done, just preview it in your knowledge base view!
Nested Decision Trees
Please keep in mind that nested Decision Trees are not supported at the moment and you might experience issues 😕
However, you should be able to achieve the desired results using a single Decision Tree! Here is how you can do that: 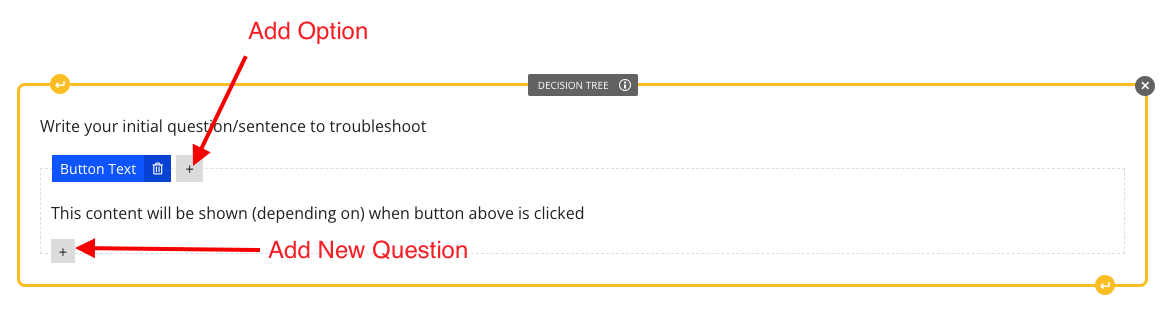
When authors are editing an article from the article editor, they have two buttons:
- With the Add Option button, they can add new branches (or responses) to the question above it;
- With the Add new Question button, they can add another question (just like a new Decision Tree)
Can I customize Decision Trees?
Absolutely! You can customize the alignment of the text as well as the color of the buttons.
Feel free to submit a customization request and we will be happy to apply these changes for you!
If you don't know how to do it, check out this helpful article: How To Submit Customization Requests.